Showing posts with label dessert. Show all posts

Wednesday, June 18, 2014

Grilled Honey Peaches with Soft, Chewy Oatmeal Cookies

I wish summer could last forever.  I've been sitting at my desk all morning listening to the birds chirp outside the open window, not to mention the snores coming from down at my feet.  My four legged friends are exhausted still from the long walk my daughter took them on yesterday.  I ate a whole basket of blackberries all by my lonesome yesterday without remorse.  I polished off quite a few strawberries and raspberries too, but let's just keep that under our hat.  Despite my schedule being turned upside down by all the extra bodies and activities in the house, I'm enjoying a sense of peace that seems to come over me when the sun amps up around here.

I find myself wandering across town every chance I get to see what new fruits are coming out of the local orchards.  Something about summer that makes everyday feel like a new one.  I'm hoping to see jars of fresh jam on my counter any day now, I'm hoping my daughter is ready to drive me to the farm stand every chance we get since she has her permit now.  I'm hoping the flip-flop tan mark on my feet will get more and more pronounced and I'm hoping we get a chance to go on at least one adventure before the summer draws to a close.
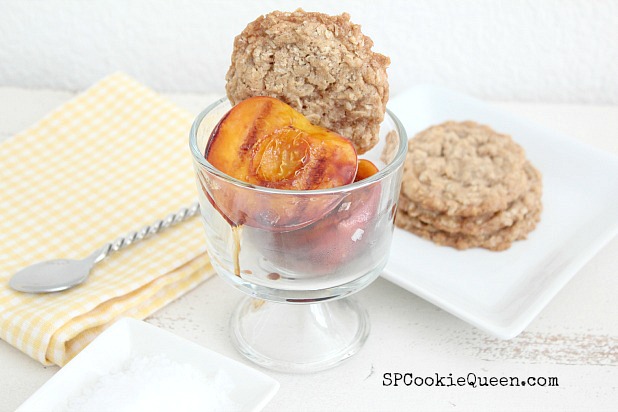
Grilled Peach & Oatmeal Cookie

Grilled Honey Peaches and Soft, Chewy Oatmeal Cookies

Bake cookies and set aside.

Oatmeal Cookies:
1 stick (1/2 cup) + 3 tablespoons unsalted butter, room temp
1/2 cup light brown sugar 
1/2 cup granulated sugar 
1 cup all-purpose flour 
1 teaspoon ground cinnamon 
1/2 teaspoon baking powder 
1/2 teaspoon baking soda 
1/2 teaspoon salt 
1 large egg 
1 teaspoon vanilla extract 
1 1/2 cups old-fashioned rolled oats 

Add butter and sugars to a mixing bowl or the bowl of a mixer and mix until butter looks light and fluffy. Add the flour, cinnamon, baking powder, baking soda, salt, egg, and vanilla and mix until combined. Add oatmeal and mix until combined. Place dough in fridge for 2 hours or so until cold. (Don't skip this step or your cookies will come out flat and crispy.)

Use a tablespoon or cookie scoop to scoop out 1 1/2" balls of cookie dough, place the balls onto a cookie sheet lined with parchment or a silpat. Press the balls down slightly leaving them at least 1/2" thick. Bake in 350 degree F oven for 12 to 14 minutes. 

Makes about 24 cookies.

Several ripe peaches split and kernel removed
Small amount of honey
Flake sea salt

Drizzle cut side of peach halves with honey and place skin side down on medium grill for 2 minutes and turn to honey side and grill for 2-3 more minutes.  Just want to warm the peaches and soften them and caramelize them a bit.  Sprinkle the grilled peaches with a pinch of sea salt.  Serve in a bowl with cookies and a squirt of whip cream if you so desire.

I'm hoping that summer is being as good to you as this bowl of warm honey peaches with soft, chewy oatmeal cookies was to me.

Enjoy,

Gina

Tuesday, February 11, 2014

Chocolate Pecan Chess Bars and Valentine's Crafts


It has been brought to my attention that I have been neglecting this space again.  While that may be true, I've been neglecting my homework also if that makes you feel any better.  I may have gotten a little carried away with all the craft preparations for the Valentine's party I had for the kids this weekend.  When glitter and gem stones are involved I somehow lose all track of time.

I sometimes wonder who the bigger kid is at these affairs.  I was setting everything up, getting all the packages open and before I knew it I was knee deep in decoupage and sequins.  I bought some vases at the dollar store and with a few tissue paper squares; sequins, mod podge (glue), and a little ribbon had quite the cute project ready for my little guests to make for themselves.


I had all the supplies necessary for the kids to make their own crowns.  I made a sample one for myself with no intention what so ever of sharing.  Imagine the horror when I saw my nephew running around with it manhandling it, hence the glitter all over it.  Let's just put it this way, he is lucky he is 1 and adorable or I may have to of had a little talk with him.  Crowns of this caliber don't just grow on trees you know. Wait a second; these were made of paper, so scratch that last statement.


Did I have fun with the desserts; let's just say there was homemade marshmallow fluff involved.  In my usual neglectful fashion though, photos were neglected to be taken.  So as an apology I'm offering you some decadent Chocolate Pecan Chess Bars that would be perfect for your Valentines.


Chocolate Pecan Chess Bars

Crust: 
1/2 cup unsalted butter, cut into 1/2-inch pieces 
1/2 cup granulated sugar 
2 cups all-purpose flour 
1/2 teaspoon salt 

Filling: 
1 cup granulated sugar 
8 ounces semi-sweet chocolate, melted 
1/2 cup unsalted butter, melted 
3 large eggs 
1 teaspoon vanilla extract 
1/2 teaspoon salt 
1/2 cup milk 

Topping: 
56 pecan halves, (3 1/2 ounces) or more if you’d like 

Preheat oven to 350 degrees F. 

Combine butter, sugar, flour, and salt in the bowl of a food processor and pulse until the mixture is barely stating to come together. Press the crumbs into a 9 x 13 x 2-inch baking pan and bake for 17 minutes. (If you don’t have a food processor, you could melt the butter and just mix all the ingredients together in a bowl and press in the pan.) Let cool for 10 minutes or so. 

Mix sugar, chocolate, butter, eggs, vanilla extract, salt, and milk together and pour over the baked crust. Place pecan halves evenly over the top of the chocolate batter. 

Bake for 20-25 minutes. 

Let cool and cut into squares for serving.


In the off chance I neglect you on Valentine's Day, let me just say how much I love having you stop by here.

Happy Valentine's Day,

Gina

Thursday, October 17, 2013

I prefer my rattler with extra Nutella or nothing at all!


I'm officially changing my name to Halloween Queen.  I had way too much fun making all the Halloween recipes you've seen this week.  I have no idea where some of my ideas come from, but I was fooling around in the kitchen and before you know it I was making a s'mores rattlesnake.

I wanted it to be easy enough for a kid to make with a little help.  Take a large square of graham cracker and cut the corners off to make a diagonal shaped head. Cut graham cracker squares down the center into rectangles. Cut a tail piece out of a rectangular piece of graham cracker.


Smear Nutella on the pieces and cut marshmallows in half with kitchen scissors and place them cut side down on the snake.  For the tail piece pipe a few stripes of peanut butter with peanut butter placed in a disposable piping bag and add a few chocolate chips as rattles.


Then blister the top of your marshmallows under a broiler or use a kitchen torch.  Just be careful not to melt the marshmallows, just give your snake a nice sunburn.  Attach a few snake scales (toasted sliced almonds) with the peanut butter in the piping bag.  Give your snake a couple of candy eyes and a licorice mouth.


I decided to have my rattler snake around the celery and carrot sticks but you could have him slither anywhere you'd like.


I have to get on costume making duty for the next couple of days, but hope to have the final two recipes up for you next week so we can keep this party going.

Enjoy,

Gina

Wednesday, May 22, 2013

Cherry-Balsamic Cheesecake Bars and Speed Blogging


Today is my Sister-In-Law's birthday and I wanted to bring a dessert with me to a dinner for her tonight, so I headed to the kitchen this afternoon and whipped up these Cherry-Balsamic Cheesecake bars.

Crust:
1 cup unsalted butter, room temperature, cut into 1/2-inch pieces
1/2 cup granulated sugar
2 cups all-purpose flour
1/4 teaspoon salt (I prefer Kosher, but we all have our issues)

Cheesecake Filling:
12 ounces cream cheese, room temperature
1/2 cup granulated sugar
1/2 cup sour cream
1 egg
1 tablespoon all-purpose flour
2 teaspoons vanilla bean paste or extract

Balsamic-Cherry Topping:
10 ounces cherries, pitted
4 ounces sugar or about 1/2 cup
4 tablespoons balsamic vinegar

Preheat oven to 350 degrees F.

1.  Add cherries, sugar, and vinegar to a medium sauce pan and bring to a boil on medium-high heat.  Stir often and let boil for 13-15 minutes until the topping is starting to thicken.


2.  Add butter, granulated sugar, flour ,and salt to the bowl of a food processor and pulse until just starting to combine.  You can use a bowl and cut the butter in with a pastry blender if you don't have a processor.

3.  Spray a 9" x 13" pan with no-stick spray, put crust in and pat down.  Bake for 15 minutes.  I'm always bringing desserts here and there and I have to tell you just how excited I was to spot this nice disposable one in the market.


4.  Add cream cheese, sugar, sour cream, egg, flour, and vanilla to the bowl of a food processor or blender and pulse until smooth.

5.  Pour the cheesecake over the warm crust (straight out of the oven is a little too hot).  Spread to the edges.

6.  Place dollops of the cherry topping every couple of inches over the top of the cheesecake.  I had a hard time with swirls before, but this time I poked the cherries a bit under the surface before swirling and had a better result.

7.  Bake for 25-28 minutes until the cheesecake is set.  Chill, because eating warm cheesecake is reserved for days when you are on the verge of hurting someone.

Do you ever have one of those weeks where you feel like every time you sit down you have to get back up? Well I've been having one of those weeks for the last few months (possibly years, but I do tend to be in denial from time to time).

I keep thinking maybe there is a better way to manage everything I have going on these days, perhaps speed blogging.  I could just hurl pictures of food at you every few hours and then let the chips fall where they may (although there is that whole law of gravity nonsense).

Say a prayer that these bars are cool before I have to run out of the house again.  (Too late, gotta run Hot Dog Dude is glaring at me it's time to go.)

Gina

Tuesday, April 30, 2013

Hazelnut Whole Wheat Scones with Maple Glaze and "Whoops, My Bad"


Have you ever been stone cold busted with peanut butter buttercream on your face?  The other evening I posted a picture on my Facebook of the banana macarons I was working on and Azmina instantly busted me out by commenting, "Heh, I think it's awesome that your last post said you were going to focus on easy food and then you happened to whip these up."  (Whoops, my bad!)

You see Azmina is a skilled and seasoned lawyer.  Armed with the following evidence "Easy crap to make for dinner", she didn't waste any time zeroing in on my truth twisting and extracting a confession out of me in a mere 2.6 seconds.  It spewed off my tongue faster than kale chips, "Obviously, I'm a liar."

Luckily for me I wasn't in a real court or right about now I'd be trying to figure out how not to shower for infinity. Instead I was thinking of inviting Azmina over here to interrogate my teenage daughter and her friends, I was also hoping instead of her hourly rate we could possibly work out some sort of cookies for services rendered type of agreement.

Seriously, she is that good.  After she busted me I was so riddled with guilt I was on the phone with my mom and felt the need to confess all sorts of things; like the time Hot Dog Dude came tumbling down the stairs and all I could do was stand there laughing before I realized I should probably ask if he's okay.

Or that I made the most amazing scones the other day and I was going to blog about them but my cuticles hurt and that really messed up my typing and so instead I just went shoe shopping.

Toasted Hazelnut Whole Wheat Scones with Maple Glaze


Or that I made both peanut butter buttercream and black sesame buttercream fillings, both were good, but the peanut butter made me feel special in a way I've never felt before.  


I also told her that when I lay my eyes on a cute cake stand; I can't just walk away quietly, instead I have to bring it home and load it up with baked good. 


I'm going to b.a.l's soon (bakers and liars anonymous).

Enjoy,

Gina

Thursday, February 28, 2013

Lemon, Blueberry Thumbprint Cookies


In a sad but true twist of my week, it is yet Thursday again.  The fact that it is Thursday means I have to face up to the fact that tonight I have night school and I have yet again failed to do my homework.  (Wait a second...does that make me a teacher's worst nightmare?)  I do have plenty of great excuses though.  No seriously.  It's tax season and I have been doing tons of research trying to find some answers for a complicated return.

I was really ready to go into hiding to avoid having to deal with it at all, when in a final fit of desperation I decided to give the IRS a call.  After several transfers I finally ended up with a "complicated" (boy did they name that department aptly) operator.  In less than a minute John had solved the most complicated tax situation I have yet to encounter.  After an initial gush of thanks, I started to feel a slight trickle of a tear starting to stream down my face.  Then I decided it would probably be much too awkward for the both of us if I started to cry on the phone.

Instead I hopped and skipped into the kitchen to make some cookies.  I'm hoping to offer them to my night school teacher as a bribe peace offering for being her worst student ever.

Lemon, Blueberry Thumbprint Cookies
Cookie Dough:
12 tablespoons unsalted butter, room temperature
1/2 cup granulated sugar
1 egg
1 3/4 cups all-purpose flour
1/4 teaspoon kosher salt
1/2 teaspoon baking soda
Zest of one lemon
1 tablespoon lemon juice

Lemon Sugar:
1/3 cup granulated sugar
Zest of one lemon

Also need:
1/3 cup blueberry jam

Preheat oven to 350 degrees F.

Combine butter, sugar, egg, flour, salt, baking soda, lemon zest, and lemon juice in a bowl and mix until combined.

Combine sugar and lemon zest in a food processor and pulse a couple of times until well combined.  Pour into a small bowl.

Shape the cookie dough into balls about 1 1/2-inch around and roll the balls into the lemon-sugar.  Place the balls a couple inches apart onto cookie sheets lined with silpats or parchment paper.

Press a dent in the middle of each ball with your thumb and fill with 1/4 teaspoon or so of blueberry jam.


Bake for 8-10 minutes.

Makes 24 cookies.

The blueberry jam bleeds a bit on the dough, perhaps not making for the prettiest of cookies.  These ugly ducklings were a serious flavor explosion though more than making up for any lacking in the looks department.

I know what you guys are thinking, "this lady eats nothing but desserts".  While on occasion that's true, but I do try and eat healthy occasionally.  Today for lunch I had a super tasty veggie wrap.  On a pretty tasty tortilla I might add.  I'd totally drop the name of them for you if I had been gifted these. For some reason, I just don't get sent the free stuff.  Hmm, pretty sure it has nothing to do with my About Me page.


Enjoy,

Gina


Tuesday, February 26, 2013

S'mores Cupcakes


My brother texted me a photo late the other evening of S'mores Cupcakes.  He asked me if I could make him some.  "Tonight I'm assuming?", was my response.  I probably would went have went out that night to get the ingredients I needed except I was already in my I'm not going anywhere gear.  I hope my brother is happy though because I think I lost a little sleep thinking about these that night.

I had to be sure and make it clear to him, these cupcakes were to be removed from my premises promptly before I'd make them.  I've been trying to cut back on sweets (feel free to laugh, I did) and I really didn't need these cupcakes staring at me mocking.  "Eat me, you know you want me!"  "It will be completely painless when you go and try on swimsuits!"

Dark Chocolate Cake
1 cup granulated sugar
3/4 cups + 3 tablespoons all-purpose flour
1/4 cup + 3 tablespoons Dutch process cocoa powder
3/4 teaspoon baking powder
3/4 teaspoon baking soda
1/2 teaspoon salt
1 large egg
1/2 cup milk
1/4 cup vegetable oil
1 teaspoon vanilla extract
1/2 cup boiling water

Heat oven to 350 degrees F.

Line 12 muffin cups with paper liners.  

In a mixer combine, sugar, flour, cocoa powder, baking powder, baking soda, salt, egg, milk, oil, and vanilla extract, mix on low-speed until combined.  Slowly add water and mix until combined.

Divide the mixture between the 12 muffin cups.  They will end up about 3/4 full.

Bake 14-16 minutes.  Let cool.

Chocolate Buttercream Frosting
8 tablespoons unsalted butter, room temperature
2 cups powdered sugar
1/4 cup + 3 tablespoons Dutch process cocoa powder
1/8 cup milk
1 teaspoon vanilla extract

Add butter to a mixer or bowl and beat for 1-2 minutes until butter starts to get fluffy.  Add cocoa powder and mix. Add powder sugar, milk, vanilla and beat on low speed until light and fluffy.

Frost cupcakes.

S'mores Topping
2 cups Golden Grahams cereal
2 cups miniature marshmallows
6 ounces dark chocolate (or semi-sweet, or milk chocolate it's your call)
3 tablespoons heavy cream


I used a muffin pan to shape the toppers, but I would suggest just doing them on parchment instead for easier removal.  (My muffin pan has the scars to prove it.)

Combine the chocolate and heavy cream in a heat-proof bowl and melt the chocolate over a pan of simmering water.  Or on half-power in the microwave.

Smear a 2-inch circle of chocolate on the bottom and add a few marshmallows and a few pieces of golden grahams.  Drizzle over that a little bit more of the melted chocolate and then add more marshmallows and more cereal.  Place in the fridge until hardened up.  Place the toppers on the frosted cupcakes.

I just hit the marshmallows with a kitchen torch to toast them.


I'm warning my brother right now, he has until 3:30 to come and get these or they are going out on the curb with this sign.  

I'd suggest driving by my house really slowly about 3:31 just to check!

Enjoy,

Gina

Friday, February 15, 2013

Red Velvet and simple "I Love You" ideas


One thing I've learned over the years is that I don't need complicated or grand gestures to feel loved.  I turned a long week around, simplified it and the love felt all the same.  My husband has been home late every night and while he isn't the most romantic guy (Unless camo somehow translates to romance?) he usually stops and gets me flowers.  I was out anyways yesterday morning so I decided to handle that one for him so he didn't have to waste his evening in long lines after another long day.  It was a win-win for both of us.

I got my work done early and headed into the kitchen to fix some treats for my Valentine's.  My daughter and her friends were coming home after school to eat and hang out.

Two of my daughter's guy friends were arguing as they mowed down hamburgers and cupcakes as to who loved me more.  I'm pretty sure it was the food gone straight to the brain talking, but either way they certainly made my Valentine's Day.   I'm convinced these kids have no food available to them at home.  A few weeks ago, one of my daughter's friends knocked on the door after school and asked if I had any cake.  I wish I was making that up.

My girlfriend makes the best chocolate dipped pretzels and I thought I'd Valentine up her specialty.

I melted about 2 ounces of white chocolate, dark chocolate, and pink candy melts each in small heat-proof bowls. Use the microwave at half power or defrost and stir every 30 seconds or so until the chocolate is melted.  Dip the pretzels and place them on a piece of parchment or wax paper to set up.  The fridge will speed up the process.


Since I was simply having fun with "I love you", I broke up a few of the pretzels to create these fun ones to eat.


I had a little leftover chocolate so I placed the chocolate in disposable piping bags, cut a small tip off the end and piped cupcake toppers onto parchment paper and put them in the fridge.

I baked up a couple dozen Red Velvet Cupcakes and put my toppers on them.  Patty - just posted a Red Velvet Cupcake with the cutest toppers, will have to try those soon.


I hope that all my loves knew that I love them!

I was staring at the calendar this morning and wondering where my week went yet again.  It was just Monday, wasn't it?  I must confess to my mind being elsewhere these days.  I have so many other things that are distracting me and keeping me going in multiple directions.  Some of my best days are when I can cast aside some of those distractions and just play around a bit.  What are some of your best days?

Enjoy,

Gina


Saturday, January 12, 2013

Blueberry, Lemon, Cream Cheese Muffins - Bringing the sunshine back


I was poised in front of the kitchen window this morning drinking in the sunlight spilling in. I've been a bit blue this week.  It's been cold, dark, and rainy as of late, not really a combination I enjoy one bit. Maybe it's all the work I did over the holidays catching up to me or finally having a few quite moments of reflection.

I'll heard good news and it brings my smile back quickly.  Then I hear bad news and it rips off the band-aid to a wound that hasn't quite yet healed.  I try not to let it all keep me down, but sometimes I just need to stop for a moment and really let it all soak in.

I let this week be a blue week, but next week I'm bringing back the sunshine.  I'm looking ahead and switching course.  It's a new year and it's time for new memories, hopefully more new friends and who knows what else is possible.    

I for one have so many things already on my want-to-do list.  Furniture yet to find and redesign, recipes already sketched out in my mind, parties I want to throw, crafts to glitter and bedazzle, places I want to visit. (Seriously, you have no idea how bad I need a vacation?  In fact so much so I've solicited a Heavy Metal band to be their roadie just so I can get a free European vacation.) (You thinking I'm kidding here, huh?)  I find looking ahead is my way out of where I'm stuck at.

I decided to change up this coffee cake recipe from Sunset just for kicks!

Blueberry layer:
12 ounces frozen blueberries
3 tablespoons sugar
1 tablespoon water
2 teaspoons cornstarch
2 teaspoons water

Batter:
2 cups all-purpose flour
3/4 cup sugar
1/2 cup cold unsalted butter, cut up into 1/2" sized pieces
Zest from one lemon
1/2 teaspoon baking powder
1/2 teaspoon baking soda
1/4 teaspoon salt
6 ounces plain non-fat Greek yogurt
1 teaspoon vanilla extract
2 teaspoons lemon juice
2 large eggs

Cream cheese mixture:
5 ounces cream cheese, room temperature
1/4 cup sugar
1 teaspoon lemon juice

Also needed:
1/3 cup coarsely chopped roasted, salted almonds

Preheat oven to 350 degrees F.

1) In a sauce pan over medium heat bring blueberries, sugar, and water to a boil.  Lower heat and simmer for about 3 minutes.  In a small bowl blend cornstarch and water.  Add cornstarch mixture to pan, stir until thickened.  Let cool.

2)  In a food processor add flour, sugar, butter, and lemon zest.  Pulse until it resembles coarse crumbs.  Reserve 1/2 cup; pour remaining into a large bowl.  Stir in baking powder, baking soda, and salt.  Stir to combine.  If you don't have a food processor, a pastry blender works great.

3)  Add yogurt, vanilla, lemon juice, and eggs; stir into flour mixture until incorporated.

4)  Use a muffin pan with 12 cups, line the cups with paper or aluminum liners and fill the 12 cups with the batter mixture evenly divided.  Make a slight indent in the center with a spoon.


5)  In a food processor (or bowl) mix together cream cheese, sugar, and lemon juice until smooth.  Divide this mixture evenly over the batter.

6)  Divide the blueberry mixture over the cream cheese layer.


7)  Sprinkle the reserved crumb mixture over the top of the blueberry layer.


8)  Divide the nuts evenly over the 12 muffins.

Bake for 20-25 minutes.


Do you have any big plans for the year ahead?

Gina

Tuesday, January 1, 2013

{Meyer} Lemon Bars a winter birthday treat


2012 seems to have come and went.  I don't do the whole resolution thing on New Years.  I really don't think about New Years as a holiday; to me it's always been my brother Michael's birthday.  I've heard friends lament that they are robbed of their birthdays when their big day collides with the holidays.  I wanted to be sure Michael's birthday didn't get lost in the holiday shuffle this year, so I asked him what his birthday dessert request was and then quickly went about whipping it up.

He requested lemon bars and luckily for him I replaced my beloved dwarf Meyer lemon tree that I had to leave behind back in March when we moved.  I planted this tree in April and was surprised by the nice little crop of lemons I got.


Meyer Lemon Bars

Crust:
1 cup unsalted butter, room temperature, cut into 1/2" pieces
1/2 cup granulated sugar
2 cups all-purpose flour
1/4 teaspoon salt
Zest from one Meyer lemon

Filling:
4 large eggs
2 cups granulated sugar
1/2 cup all-purpose flour
1/2 cup freshly squeezed Meyer lemon juice
Zest from one Meyer lemon
2 teaspoons baking powder
1/2 teaspoon salt

Preheat oven to 350 degrees F.

Add butter, sugar, flour, salt, and lemon zest to the bowl of a food processor and pulse until still slightly crumbly but starting to come together.  You can also use a pastry cutter to do the same thing.

Spray a 9" x 13" pan with no-stick spray (for even easier removal of the bars cut a piece of parchment paper to fit on the bottom of the pan).  Spread the crust mixture over the bottom of the pan and press it down with your fingers.

Bake the crust for 15 minutes.

In a large bowl whisk together eggs, sugar, flour, lemon juice, zest, baking powder, and salt and pour over hot crust.  Bake for 25-30 more minutes or until the filling is set and no longer wobbly.

When completely cooled dust top with powdered sugar and cut into squares.


Meyer lemons are sweeter and milder than regular lemons.  I think they make the bars a touch sweeter and less tart, but feel free to substitute regular lemons if you can't find the Meyer ones in your area.

I know I can't get enough of these when they are in season here.  Matter of fact if you can't find them; maybe you should head over my way.  Besides you'd be just in time to enjoy the pig we will be grubbing on this Sunday.

My apologies for not returning comments and e-mails promptly the last few weeks.  Besides all the craziness of Christmas and another one right around the corner, I had to spend my precious free minutes fawning over my newest nephew my brother Michael and his wife gave me.


Don't be alarmed if you hear a loud crash and some crazy snoring.  It will just be me crashed out on the couch taking a long overdue winter nap.

Happy New Years!!!

Gina


Thursday, December 6, 2012

Frosted Apple-Cinnamon Drops


I was feeling a bit nostalgic the other evening and reminiscing about apple cookies my mom used to make for us when we were little.  I did a little research and I found an old recipe in a Sunset Cookie book that sounded similar, but I felt it needed a little something-something to make it worthy of adding it to the cookie line-up this year.

Brown butter, oh yeah that ups the deliciousness factor.  Cinnamon Chips, heck yes, I saw Liren - Kitchen Confidante post a Pumpkin Cinnamon Chip Muffin  recipe some time back and I swear I looked high and low for those darn chips.  I finally secured some at my local Tar-jay, you should have seen me it was ridiculous.  Here I am telling everyone in the isle, "Omg, they have cinnamon chips, do you know how long I've been looking for these?"  Of course they didn't, but I sure was proud of myself.  It was the equivalent of scoring the last talking Elmo (yes I'm acutely aware I'm dating myself here) the day before Christmas.  So if you see the chips in your local store, throw them in your cart a.s.a.p., or if you spot the last bag in someone else's cart and they somehow manage to work their way into your own cart (I saw nothing).

Frosted Apple- Cinnamon Drops

Cookie Dough
1/2 cup unsalted butter
1 1/3 cups firmly packed light brown sugar
1 large egg
2 cups all-purpose flour
1 teaspoon baking soda
1 teaspoon cinnamon
1/2 teaspoon salt
1/2 teaspoon ground nutmeg
1/4 teaspoon ground cloves
1/4 cup milk
1 1/2 cups finely chopped granny smith apple (about 1 and a half apples)
1/2 cup cinnamon chips (I found Hersey's brand at my local Target)

Heat oven to 375 degrees F.

Add butter to a small saucepan and heat on medium-low heat until nicely browned.  Usually takes about 5 minutes.  To a large bowl add the brown sugar and browned butter, stir to combine.  Add the egg, flour, baking soda, cinnamon, salt, nutmeg, cloves, and milk and stir until combined.

Stir in the chopped apples and cinnamon chips.  If you can't find the cinnamon ones, I think semi-sweet chips would be great in these too.

Scoop tablespoon sized amounts of dough onto a cookie sheet lined with parchment or a silpat.  These spread a bit so leave a little room between each cookie.  Should get 27 cookies or more depending on size.

Bake for 12-14 minutes until browning slightly on the bottom.  If you press one with your finger and it doesn't start to spring back they need a little more time.  Let cool.  For the most even baking I like to rotate my pans from upper to lower and lower to upper halfway between cooking time.

Icing
4 tablespoons butter
2 ounces cream cheese
1 1/4 cups powdered sugar
Zest from 1 lemon
1 teaspoon lemon juice

Combine butter and cream cheese in a small saucepan and heat on medium-low heat until melted and whisk a little to combine. Whisk in powdered sugar, lemon zest and juice.  Should be a nice drizzling consistency.  If it seems too runny; whisk in more powdered sugar a spoonful at a time.  You can drizzle the icing over the cookies with a spoon or put it into a piping bag.  Let icing firm up and store the cookies in between layers of wax paper in an airtight container.


Like the cute red heart on these?  I just reserved a small amount of the icing and tinted it red and piped on a heart.  Adds just a little extra love I think.

Enjoy,

Gina

Tuesday, December 4, 2012

Candy Cane Shortbread Dipped in Chocolate


It's beginning to look a lot like Christmas over here!  The tree is up and decorated, stockings are hung, and even my Christmas cards are here and awaiting signing.  I've decided to get an earlier start this year because if you can believe this, sometimes I procrastinate (sad, but true) and I'm baking all day and shopping at night the week before Christmas.  Not this year.  I've spread out all the requirements on the to-do list, have a few parties in the works, and the week nights before Christmas I planned to be sprawled out on the couch with a blankie.  At least that's my plan anyways.  I think we all know how the best laid plans go.

One of those requirements on my to-do list is get all my cookie recipes locked down before the holiday.  I have to admit, Peppermint & Chocolate Cookies aren't something I regularly make.  The reason is I'm not a fan of mint extract.  (Probably doesn't help I took a big swig of that stuff to see what it tasted like and almost lost it.)  Kim - Liv Life Too and Christiane - Taking on magazines asked me if I could share a recipe using these ingredients.  So I fooled around with a mint syrup to see if I could impart that mint flavor without the weird aftertaste.

Even Hot Dog Dude approved of these and that is saying a lot, because he hates mint.  I made the ones on the left for him, I called them "mint light", sans the extra peppermint bits.

Candy Cane Shortbread Dipped in Chocolate

Mint Syrup
3/4 cup granulated sugar
1/2 cup water
5-6 sprigs fresh spearmint

Place sugar, water, and mint in a small saucepan and bring to a medium boil, let boil for 5 minutes.  Turn heat off and cover and let sit for 20 minutes or so until cooled.

Strain out mint leaves, should yield about 2/3 cup.  Set aside

Candy Cane Shortbread
3/4 pound unsalted butter, room temperature
1 batch mint syrup
3 1/2 cups all-purpose flour
1/4 teaspoon salt
1/4 cup crushed peppermint candy canes + more for sprinkling on top

Also need 6 ounces milk or dark chocolate, finely chopped

Combine in a bowl of a mixer the butter and mint syrup and mix until combined.  Add the flour and salt and mix until combined.  Stir in the candy cane bits.  If you don't want to clean up candy cane bits from every corner of your kitchen; place the canes in a large ziploc bag and bash them with a flat heavy object.

Divide the dough into thirds and place a portion of the dough onto a piece of plastic wrap and form into a log and then press it into a square shape.  You want it to be about 1 1/2 - 2 inches in diameter.  Repeat for the other two portions.

Place the logs on a sheet pan and place in the freezer for 40 minutes or so until firm.

Heat oven to 350 degrees F.

Slice off 1/2-inch slices from the rolls and place on a cookie sheet lined with parchment or silpats a couple inches apart.  Bake for 13-15 minutes.  Let cool.

Melt the chocolate in the top of a double boiler over low heat.  Dip the corner of each cookie in the chocolate and sprinkle with a little crushed candy cane.

Enjoy,

Gina


Tuesday, October 30, 2012

Pumpkin and Chocolate Pie in a Jar and Photography Lessons Learned


I was milling around the kitchen the other evening, having barely put away the last of the dinner dishes I started having intense cravings for something sweet.  The play-off game for the World Series was on and something about curling up on the couch for a few hours without a snack just didn't seem right.  Plus I think its bad luck for the team. Or at least that was a good enough reason for me to go throw something in the oven.

I had made a chocolate peanut butter chess pie for company the other day and while I liked parts of the pie, it was just too rich and not really my favorite thing I had ever made.  My mind went back to the Pumpkin Pie & Crumble Cakes I made a few weeks ago; I decided a recipe experiment was in order. Nothing ventured, nothing gained, right?


Chocolate Pie with a Bite:
6 tablespoons unsalted butter, cut into 1/2" pieces
6 ounces dark chocolate, finely chopped
1 1/4 cups granulated sugar
1 1/2 teaspoons vanilla extract
1/4 teaspoon salt
3 large eggs
1/8 teaspoon ground cayenne pepper

Heat oven to 350 degrees F.

In a heat-proof bowl placed upon a pot of simmering water add the butter and chocolate, stir and let get completely melted.  Take off the heat.

To the chocolate add the sugar, vanilla, salt, eggs, and cayenne and whisk together until smooth.

Take eight clean 8-ounce heat-proof jelly jars and spray them with no-stick spray and place them on a baking sheet.

Divide the chocolate batter evenly amongst the jars.  They will be about 1/3 full each.  Set aside.

Pumpkin Pie
15 ounce can pumpkin puree
6 ounces evaporated milk
3/4 cup low-fat milk
2/3 cup sugar
2 large eggs
1 teaspoon ground cinnamon
1/2 teaspoon ground ginger
1/8 teaspoon ground cloves
1/2 teaspoon salt

Combine the pumpkin, evaporated milk, milk, sugar, eggs, cinnamon, ginger, cloves, and salt in a large bowl and whisk until combined.

Pour the pumpkin mixture evenly over the chocolate and bake for 35-45 minutes.  I waited till I saw the tops of the pumpkin were set and not still wet and wobbly, or use a toothpick and see if it comes out clean.  Let cool to room temperature.


After the pies cool, they will deflate a bit, leaving ample room for a little whip cream and leftover chocolate shavings.

Serves 8.

These pies must have been good luck after all, the San Francisco Giants won that night and went on to win the World Series.  Okay probably wasn't my pies, just their incredible teamwork, either way I like to think maybe I had some small part in it.


When I first started writing this blog 2 and 1/2 years ago the only thing I knew about photography was how to point my camera at the kids and tell them "say cheese".  My first photographs on here pointed that out in glaringly obvious fashion.  After a couple months I started noticing other bloggers and their photography styles.  One in particular was Nancy - Spicie Foodie.  I remember thinking to myself I hope I can photograph that well one day.  I kept reading her and was happy to learn she willingly shared her equipment and tips with all of us.  I eventually upgraded to a DSLR and well, took thousands of pictures.  Yet I still felt like there were some technical things I didn't have down and some things that I had read that still didn't make sense.

I knew Nancy was working on an e-book for food photography and knew I had to read it.  I'm glad I did, not only does she explain all the mysteries of lighting and go over camera angles and styling tips, she also does it with a multitude of photographs.  Just seeing some of her photos made things click for me.  I've learned over the years I'm a visual learner, seriously I could sit in a lecture and come out and not tell you one thing I've learned.  If you want to enhance your food photography skills, go check out Yummy Pics Food Photography for Bloggers. Hopefully Nancy will approve of these pie photos I shot the other day; I used a few of her suggestions.  I wrote this about Nancy because I was hoping it was the least I could do to thank her for all she has taught me.


Happy Halloween!

Gina

Wednesday, October 24, 2012

Billionaire Bars and Foodbuzz Festival 2012


I saw a recipe for Billionaire Bars some time ago on Brown Eyed Baker and was eagerly awaiting a reason to whip up a batch.  My daughter who is away at college called at the last minute this week and told me she was coming home on Friday for a visit.  Bingo, I had a reason.

After reading the recipe something caught my eye immediately, the recipe called for packaged caramels.  I haven't eaten one of those things since I was a kid, plus I was being a tightwad and didn't want to go to the store for one more thing (besides I seriously doubt Billionaires got to be Billionaires by squandering their money).

Preheat the oven to 350 degrees F.

Shortbread Layer:
1/3 cup unsalted butter, cold, cut into 1/2-inch cubes
1/3 cup granulated sugar
1/2 teaspoon vanilla extract
1/4 teaspoon salt
1 cup all-purpose flour

Spray an 8-inch square baking pan with no-stick spray.  The original version calls for parchment but I was out and spray works fine (that's another 29 cents I'll be adding to my billionaire fund, thank you very much).

I think the less the butter is processed for shortbread the more tender it is, so I went with the food processor method.  Place the butter, sugar, vanilla extract, salt, and flour in a food processor and pulse until it is in small crumbs and barely sticking together.

Press into the bottom of the prepared pan with your fingers.  Use a fork and poke shallow holes into the dough. Bake 18-22 minutes or until edges are golden.  Set aside to cool.

Salted Caramel Layer:
1/2 cup granulated sugar
3 tablespoons water
1/4 cup heavy cream
Pinch flake sea salt

Add sugar and water to a small heavy skillet, heat on medium high heat until rapidly bubbling away.  Leave undisturbed until the edges of the caramel start to turn amber in color, turn off the heat and add the cream and salt and whisk until the caramel comes back together.  You may have to turn the heat back on for a minute if the caramel isn't really smooth.  Pour the caramel over the crust, tilt the pan to spread out and place in the fridge.

I know making caramel can be intimidating; if it doesn't sound like your thing, feel free to try the original version it calls for packaged caramels melted.

Cookie Dough Layer:
1/2 cup unsalted butter, softened
1/4 cup granulated sugar
1/2 cup light brown sugar, packed
2 tablespoons heavy cream
1/2 teaspoon vanilla extract
3/4 cup all-purpose flour
1/8 teaspoon salt
1/2 cup mini semi-sweet chocolate chips

Use an electric mixer to beat the butter, sugar, and brown sugar until light and fluffy. Add cream and vanilla, and mix well.  Add flour and salt, mixing until combined.  Stir in chocolate chips.  Use a small spatula to spread cookie dough evenly on top of caramel layer.  Place in refrigerator while making the ganache.

Dark Chocolate Ganache:
5 ounces dark chocolate, chopped into small pieces
1/3 cup heavy cream, heated until bubbles form around the edges

Place the chopped chocolate into a bowl and pour the hot cream over it and whisk until the chocolate is smooth. Pour ganache over the top of the cookie dough layer and place back in the fridge for 30 minutes or so until the bars are set.

Cut into squares in the pan.  The original recipes says if you put the parchment up the sides you can pull the bars out and cut them, I will have to try that next time although, mine weren't difficult to get out.

So with a few tweaks here and there I can say with confidence I'm pretty sure a billionaire wouldn't mind eating these.  I'm only speculating on that point but the Dollar-aires I'm usually in the company of ate the heck out of them.  My daughter brought home a few friends with her and these bars went fast.

Fine, quit twisting my arm, I'll fess up and tell you the truth - I'm a caramel snob, there you have it, yep it's true. I've had wonderful too die for caramels and I could never go back to eating those hard ones in the package; please don't hate me.


Foodbuzz Festival 2012 highlights:

Regardless of the fact Foodbuzz is now Federated Media or whether or not we are still featured publishers; we are still a community of like-minded individuals and we still need to support each other.  Besides the good Karma you are going to get back in return for being a good member of the community, you are helping support folks that are bringing us quality content and the majority of them are doing it on a negative income level.

I luckily me Gerry - Foodness Gracious.  I got some samples of the amazing caramels he was launching.


I met Greg - Sippity Sup.  He was so charming and knowledgeable I might add. I got to hear about the book on savory pies he has been working on for the last year, which I can't wait to check out.

A special thank you to Patty - Patty's Food and Azmina - Lawyer Loves Lunch, these two always make me smile and laugh.  Also it was wonderful meeting Wendy - The Weekend Gourmet in real life, she is a doll.  Happy to have found Marlene - Nosh My Way who doesn't live far from me at all.  Enjoyed sharing a wonderful dinner with Rachel - MuffinEgg and Jennie - Frolic and Detour new friends I hope to get to know better.

Enjoy,

Gina

Wednesday, October 3, 2012

Lattice-Topped Apple Pie Tart


I'm sitting here trying to write the story of the photos of an Apple Pie Tart I baked, yet my tired wrung out brain is fighting me tooth and nail.  I've been wandering as of late, my mind that as. My mind has been wandering to far away places, reading more and thinking about the future.  A future that includes a nephew due to arrive shortly and news today that twins are on the way from my other sister-in-law. I've been wandering to all the dark and dusty alley ways still untapped in the crevices of my mind.  I think sometimes in order to find yourself you must get lost, completely and utterly lost.

Funning thing is no matter how lost I get I or how much I fight the path my life is destined to be on, something gently guides me back in the right direction.  I wandered upon  Nick Malgieri's book Bake! and was guided straight to the kitchen where I set about baking his Apple Pie Tart on a leisurely Saturday afternoon.  I lovingly placed the apple bits in the pastry shell, sprinkled it generously with sugar, I placed a photo on Instagram and had my brother, sister-in-law and niece at my door in half an hour.  We ate pie and ice cream for dinner, played games and stayed up late.

Adapted from Nick's recipe.
Flaky Pastry Dough
2 cups all-purpose flour (spoon into a dry-measure cup and level off)
1/2 teaspoon salt
1 teaspoon baking powder
12 tablespoons (1 1/2 sticks) unsalted butter, cold, cut into small pieces
2 large eggs
1 teaspoon cold water if necessary

In a food processor combine flour, salt, and baking powder and pulse to combine.  If you would like more detailed crust explanation there is one on my Dark Chocolate Cream Pie.

Add pieces of butter and eggs and pulse a few times until starting to combine.  Add the water if the dough isn't coming together enough.

Divide the dough into 1/3 and 2/3 sized pieces onto pieces of plastic wrap, flatten and wrap tightly in the plastic wrap.

Store in the fridge for a minimum of 3 hours before rolling out.


Apple Filling
3 pounds Granny Smith apples, peeled, halved, cored, and cut into 1/2-inch dice
1/2 cup granulated sugar
1/4 cup light brown sugar
3 tablespoons all-purpose flour
1 teaspoon ground cinnamon
2 tablespoons cold unsalted butter, cut into 1/4" pieces

Finishing
2 tablespoons granulated sugar

Preheat the oven to 375 degrees F.

Roll out the bigger piece of dough on a floured surface and place the crust into an 11" tart pan with a removable bottom.  Use your fingers to make sure it gets into the sides and edges of the pan.  Cut off any excess from the top.

Put the apples in a large bowl.  In a small bowl mix the sugars, flour, and cinnamon.  Scatter 2 tablespoons of the sugar mixture onto the bottom of the tart crust.  Pour the rest over the apples and use a large spatula to mix together.

Scrape the filling into the prepared crust and redistribute the apple pieces so that the top of the filling is level rather than domed.  You really have to work those apples in with your fingers, but they should all fit.  Dot the filling with small pieces of butter.

Roll out the other 1/3 of the crust into a rectangle on a floured surface until it's about a 1/4" thick.  I had to go a little thinner, because I didn't have as much dough to work with.

Use a pizza wheel or serrated pastry wheel to cut dough into 1/2" wide strips.  Place 4 or 5 strips an 1" apart or so going in one direction and then the same amount, going the other.  I just pushed the edges down to the edge of the crust with my finger and cut off any extra.

Brush the top of the crust with a little water and sprinkle with the two tablespoons of sugar.

Place the tart pan on a baking sheet so it won't leak in the oven.

Bake for 45-55 minutes.


I've been fighting who I am as of late, rebelling if you will, and balking at the path I'm supposed to be on. It's funny though the harder I fight it, the more it seems futile.  This pie pulled me right back into a warm, comfy, familiar place, one that I have been many times and one that I want to visit many more times to come.  Matter of fact, I'm not sure if I can ever look at a traditional apple pie again and want it in the same way I used to.  This tart version was need I say, gasp, pretty impressive.

Maybe I can bake my way back and things will fall back into place, it's worth a shot anyways.

Do any of you have a way of finding your way back when you are lost?

Gina