Showing posts with label easy. Show all posts

Thursday, March 17, 2016

Skillet Chicken Dinner with Artichokes and Sun-Dried Tomatoes


Happy Saint Patrick’s Day!  Today is your lucky day if you are feeling Irish, by chance sporting a green ensemble, or partook in one too many green beers and can’t muster the energy to think up an easy and fast dinner this evening.  It’s been quite the busy week and despite wanting to represent for the Irish and fix a corned beef with cabbage it’s just not happening around here.

I was working in my office yesterday when I received a phone call from HDD, “Tomorrow is Saint Patrick’s Day, right”?  Me:  “Yes, and your point is”. (Spoken with my eyes rolled back in my head.)  HDD:  “Are we having corned beef”?  Me:  “Hell no, it’s gross and you can’t have it anyways”.  (I thrive on my role as Joan Crawford in Mommy Dearest, what can I say.)  HDD:  (Long sigh.)  Fine. Click. 

HDD found out he has gout a few years ago and when he eats certain proteins he gets a flare up and besides the limping around and complaining; I’m the one who really suffers.   So I’ve taken it upon myself to put some reforms into place and put us on a mostly vegetarian diet, with the exception of a little chicken or fish.  HDD has mostly gone along with the plan, but I sense he is headed towards a major breakdown soon.  All he does is drone on and on saying things like, remember how good barbecued steak is, or I could really go for some prime rib tonight.  Dream on Hot Dog Dude; dream on. 

There is an upside to HDD’s gout though; I’ve lost so much weight my mother has made it her business to tell me I’m getting too thin (like there is such a thing).  Also it’s keeping HDD on his toes because I told him if I do make steak he will never know if it’s because I’m pissed or just being nice.   


Chicken, Artichoke, Grains, and Sun-Dried Tomato Skillet
2 tablespoons extra-virgin olive oil
1-tablespoon butter
1 medium yellow onion, finely chopped
1-pound chicken breast tenders, boneless and skinless
Salt
Freshly ground black pepper
1-12 ounce jar marinated artichoke hearts, drained (discard liquid)
¾ cup shredded carrots
¼ cup sun-dried tomato strips, packed in olive oil
1 ¼ cups mixed grains (I used a mix from Trader Joe’s with couscous, quinoa, orzo, and baby garbanzo beans)
3 cups veggie stock

Add olive oil and butter to a 12-inch skillet and heat on medium-high heat. Once butter is melted add onion and let cook for 4-5 minutes until starting to get translucent.

Add the chicken pieces, salt, and pepper and cook chicken on one side for 3-4 minutes, flip and cook another 3 minutes. 

Spread the artichoke hearts, carrots, sun-dried tomatoes, and grains evenly over the chicken. Slowly pour the stock over the whole pan and bring to a boil.

Cover the pan with a lid; turn the heat down to medium and cook for 25 minutes.

Serves 4.


Happy Saint Patrick's Day!  I only wish I had a piece of this Irish Car Bomb Cake from Miss Katty to wash down my dinner tonight.

Gina

Friday, November 7, 2014

Cauliflower Pizza and I'm probably coming back for yet another life...

I'm sure you've all heard about that little old thing where you have to keep being reincarnated until you get it right here on this earth.  Well I hummed along pretty smoothly for most of my years; I mean there was a little slip up here and there.  For the most part the faux pas were negligible and I figured there was that first 40-year free pass clause anyways.  Most of the details are still a blank and I haven't quite even begun to figure out exactly where things went sideways, but trust me friends this one was bad, really bad.  In the big scheme of things I shouldn't be too upset about it, because I have this sneaking suspicion that this isn't my first rodeo here on earth and what is another 90 years or so added to the sentence.

The worst plans are always hatched out of desperation, and desperate we were.  I shouldn't have gently persuaded (conned) my sister into going along with my evilly delicious plan.  It is practically not my fault that she has not yet learned that going along with my ridiculous ideas could spell trouble.  I'm not blaming her though; actually we've both decided that the blame should rest squarely on Hot Dog Dude. (Besides, he makes it way too easy.)

It started off on such a good note; I was all decked out in my vampire slayer outfit, clutching my dagger ready for any rogue vampires whom might cross my path.  Ready, willing, and able to defend innocence against the dark forces.  Seriously, do I look ready for business or what?


What happened next was so heinous I can't even tell you here.  Look I do have a reputation in the community to uphold and why in the heck wasn't someone keeping a closer eye on where that tiny little Doc McStuffins was leaving her hard earned candy loot.  I'm too embarrassed I just can't, well maybe I could if I wrote it into a fictional story and changed the names to protect peoples privacy a little, hmm.  

How about we just change the subject and focus on the important things in life, like the very important fact that Thanksgiving is right around the corner and I haven't even begun to explore what I'm making this year.  I'm going to also completely block out the fact that I signed up to run a 5K the morning of Thanksgiving and then will come home and cook for everyone.  Complete mental blockage, it's a gift; so I suppose I shall have to add that one to the gratitude column.


Quite sometime ago I ran across Cauliflower Pizza recipes and they looked quite tasty, a pizza without carbs, can't go wrong there.  It would be perfect, except I love carbs and I'm much too lazy to cook cauliflower and then arrange it into a fancy pizza shape.  So consider this recipe a gift friends.

Cauliflower Pizza (for the lazy)
1 head cauliflower, cut into florets
1 cup cherry tomatoes, halved
1/4 cup olive oil
1 clove minced garlic
3/4 teaspoon dried oregano
1/2 teaspoon kosher salt
1/4 teaspoon freshly ground pepper
1/4 cup grated Parmesan cheese

In a small bowl whisk together the olive oil, garlic, oregano, salt, and pepper and toss over the cauliflower and tomatoes.  Place on a baking sheet lined with parchment (because we've already established we are lazy and why on earth would we want extra cleanup chores).  Bake in a preheated 400 degree F oven for 10 minutes. Remove from the oven and sprinkle with the grated parmesan and return to the oven for an addition 5-10 minutes, depending on how soft you like your cauliflower.

Serve warm or cold.


Please don't tell me you thought I'd dropped of the face of the earth.  Didn't we already establish earlier, I have plenty of more years left remaining here; so I may as well entertain myself someway and torment the internet in the process.

Enjoy,

Gina

Monday, February 17, 2014

Bruleed Steel-Cut Oatmeal with Apple Compote


I know it is a great morning when I have breakfast waiting for me in the fridge.  I didn't even have to jump out of bed this morning and get my daughter off to school.  Nope, all I had to do was heat my breakfast up, pour myself a cup of tea and crawl back into bed.

Yep, it's gonna be that kind of day, easy street all the way.  Not only did I make breakfast in advance but I am sharing it with all of you over at the lovely Mangiabella.

You are gonna want to hurry up and make yourself a batch of this Bruleed Steel-Cut Oatmeal with Apple Compote so you can get back in bed and spend the day under the covers ignoring the world.  I know I will be here as long as humanly possible or at least till I can't stand the lunch hunger pangs anymore.

Hope you all have a lovely carefree day today!

Gina 

Tuesday, October 22, 2013

Easy Halloween Batdogs Appetizer Recipe


Holy Batdogs! I know the kids are just going to go crazy over these Batdogs I created for them.  For six of the kids this will be their first Halloween party over here, that's how crazy things have been in our family, six more babies in last 2 years alone.  One of my nephews is a huge Batman fan coupled with the fact Ms. Katty from Kattyskitchen posted a Batdad video on my FB wall the other day, I just couldn't Batman get out of my head.   

I was in Trader Joe's with the biggest kid around here (Hot Dog Dude) and when he spotted mini hot dogs he threw them in the cart faster than I don't know what.  They sat in the fridge for a least a week, all the while he kept reminding me I needed to do something with those hot dogs.  That is when it occurred to me they would fit in perfectly on my diabolical Halloween menu.  

First thing you need to do is heat up the bat oven to 350 degrees F.

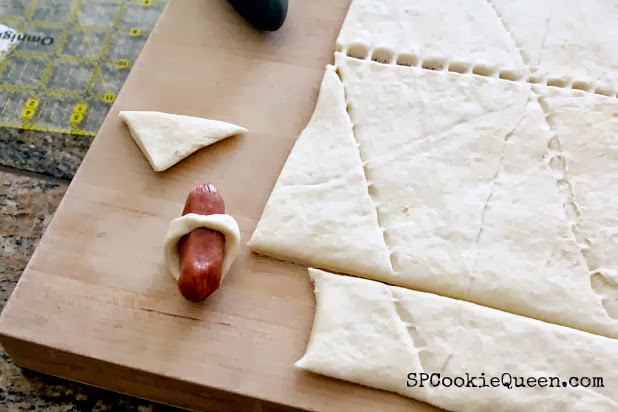
Secondly, open a roll of crescent roll dough and unroll the whole thing in one sheet on your cutting board. Cut the dough into 2-inch strips and then in 2-inch squares and then cut the squares in half on the diagonal. Lay the hot dog on the triangle as pictured and wrap up the cape and pinch it securely. Place the hot dogs with the small side of the cape down on the baking tray lined with parchment paper or sprayed with no-stick spray.  Wrap the rest of the hot dogs the same way. Bake for 5 minutes, turn them over and bake 5 more minutes until the cape is browned.


While the Batdogs are in the oven make the caped crusaders masks. Cut 1/4-inch or so off of a large sized pitted black olive, the side without the large opening.  Then stand the olive on the cutting board and cut a slit down the side.  Then turn the olive so the slit is towards the backside and cut a v-shaped notch in the front of the olive.  Place the olive masks on the Batdogs and pipe mustard eyes on with a little mustard placed in a piping bag.

My two kids disposed of those Batdogs faster than Batman rids Gotham of crime.  I'm sure the kids are going to love them too on Saturday.  Sometime I wonder who likes these parties more, the kids or me.

I just wanted to thank you guys for your continued support of this little hobby of mine and to let you know I'm having some major technical difficulties with the site and just short on time and energy all the way around in life and probably won't be posting anymore or at least not until after the holidays are over or my clone is ready. 

Happy Halloween,

Gina 


Monday, October 21, 2013

Halloween Bloody Brain Balls


It's Monday, let's do the happy dance!  Honestly I have no idea who the nut job is who just said that is.  I would be happy if Monday never existed.  But I am excited to crank up the scary music and commence with the Halloween fun I've been having around here with these Bloody Brain Popcorn Balls I will be serving the little kids victims that are headed here this weekend.  

First of all I'd like to know how I went all these years without eating brains.  Seriously, I got offered them almost every year from my father-in-law on New Years.  He would store the head of the pig he served on Christmas in the fridge until New Years and then would eat the cheek meat and brains.  Every year he'd offer me some of the brains and every year I'd pass.

Well you know what I had no idea what I was missing until I made some for myself.  I always kind of thought they would be mushy and have foreign particles in them.  Turns out I was all wrong.  I was just offered the wrong kind of brains.  Had he passed around the popcorn brains I'd have been all over them, probably would have went back for seconds and thirds.  

Bloody Popcorn Brain Balls
1 cup of popcorn kernels 
5 tablespoons vegetable or high temperature oil
Salt

Pop the kernels in hot oil, add a little salt.  Pour the popped corn leaving behind the un-popped kernels in a large bowl.

10 ounces marshmallows
3 tablespoons butter
Pink food coloring, optional (I think white brains are acceptable to some, but I prefer fresh healthy brains myself.) 
Colored licorice
Red sparkle food gel

Melt the butter in a large saucepan on medium heat.  Add the marshmallows and stir until melted.  Add a very small amount of the pink food color.  Pour the brain goo over the popcorn and stir with a silicone spatula.

Spray a 1/2 cup measuring cup with no-stick spray and pack the cup with the popcorn mixture and un-mold onto a baking sheet lined with parchment paper.  I got about twenty brains.

Shape them with your greased fingers a bit into balls and place a straw down the center for a little separation between the two halves of the old cauliflower.  


What fun would eating bloody brains be if you didn't have a few tasty bright colored veins running through them?  I found a couple different kinds to use. 


As for how bloody you'd like them, well that is completely up to you.  I prefer mine lightly hemorrhaging.  I also prefer a cup of tea to wash down my brains, but I am a bit odd like that.


Ten more days to Halloween people, ten more days!  Sorry just had to get that out of my system.

The Spooky Queen (thanks Patty)

p.s.  I may have inadvertently turned Hot Dog Dude into a zombie by giving him brains.  I sent the leftovers with him to work, and he came home that night and said, "I need more brains" with a strange glazed over look in his eyes. 

Thursday, October 17, 2013

I prefer my rattler with extra Nutella or nothing at all!


I'm officially changing my name to Halloween Queen.  I had way too much fun making all the Halloween recipes you've seen this week.  I have no idea where some of my ideas come from, but I was fooling around in the kitchen and before you know it I was making a s'mores rattlesnake.

I wanted it to be easy enough for a kid to make with a little help.  Take a large square of graham cracker and cut the corners off to make a diagonal shaped head. Cut graham cracker squares down the center into rectangles. Cut a tail piece out of a rectangular piece of graham cracker.


Smear Nutella on the pieces and cut marshmallows in half with kitchen scissors and place them cut side down on the snake.  For the tail piece pipe a few stripes of peanut butter with peanut butter placed in a disposable piping bag and add a few chocolate chips as rattles.


Then blister the top of your marshmallows under a broiler or use a kitchen torch.  Just be careful not to melt the marshmallows, just give your snake a nice sunburn.  Attach a few snake scales (toasted sliced almonds) with the peanut butter in the piping bag.  Give your snake a couple of candy eyes and a licorice mouth.


I decided to have my rattler snake around the celery and carrot sticks but you could have him slither anywhere you'd like.


I have to get on costume making duty for the next couple of days, but hope to have the final two recipes up for you next week so we can keep this party going.

Enjoy,

Gina

Friday, October 4, 2013

"Italian" Macaroni and Cheese


Thank you for the e-mails concerning my status and I can assure you I am alive and marginally well.  I did have my doubts though and was so concerned this morning when I drifted into consciousness I asked Hot Dog Dude if he could place a mirror in front of my mouth just to be sure.

He wasn't in the mood to humor me, like I was totally in the mood to humor him today when he requested I redo the same invoices I've done three times in a row now. Oh how far we fall some days.  Some days just call for comfort in the way of a hot cheesy, casserole.


Italian Macaroni and Cheese (For the record there is absolutely nothing Italian about this, but my cousin calls it that and I think that is sweet.)
1 pound dried rigatoni noodles
4 tablespoons butter
4 tablespoons all-purpose flour
6 cups milk
8 ounces cheddar cheese, cut in thin slices
Salt
Pepper
Pinch ground nutmeg

Preheat oven to 350 degrees F.

Place a large pot of water on to boil and add a few teaspoons salt, once it's boiling vigorously add the rigatoni noodles.  Cook about 10 minutes or until al dente.

Place the butter in a medium saucepan and turn on medium heat and let the butter melt.  Add the flour and whisk until smooth, cook one minute and add the milk, a little salt, pepper, and a pinch of nutmeg.  Simmer on low heat until ready to assemble the casserole. 

Drain the noodles.  Spray a casserole dish about an 11" x 13" sized one with no-stick spray and place half of the noodles on the bottom.  Add half of the cheese slices over that, sprinkle with a little S&P and pour half of the milk mixture over that.  Add the other half of the noodles, other half of the cheese, and the rest of the milk.  

Bake for 40-45 minutes or until most of the liquid is absorbed and the tops of the noodles are getting brown and crispy.

Enjoy,

Gina


Friday, February 15, 2013

Red Velvet and simple "I Love You" ideas


One thing I've learned over the years is that I don't need complicated or grand gestures to feel loved.  I turned a long week around, simplified it and the love felt all the same.  My husband has been home late every night and while he isn't the most romantic guy (Unless camo somehow translates to romance?) he usually stops and gets me flowers.  I was out anyways yesterday morning so I decided to handle that one for him so he didn't have to waste his evening in long lines after another long day.  It was a win-win for both of us.

I got my work done early and headed into the kitchen to fix some treats for my Valentine's.  My daughter and her friends were coming home after school to eat and hang out.

Two of my daughter's guy friends were arguing as they mowed down hamburgers and cupcakes as to who loved me more.  I'm pretty sure it was the food gone straight to the brain talking, but either way they certainly made my Valentine's Day.   I'm convinced these kids have no food available to them at home.  A few weeks ago, one of my daughter's friends knocked on the door after school and asked if I had any cake.  I wish I was making that up.

My girlfriend makes the best chocolate dipped pretzels and I thought I'd Valentine up her specialty.

I melted about 2 ounces of white chocolate, dark chocolate, and pink candy melts each in small heat-proof bowls. Use the microwave at half power or defrost and stir every 30 seconds or so until the chocolate is melted.  Dip the pretzels and place them on a piece of parchment or wax paper to set up.  The fridge will speed up the process.


Since I was simply having fun with "I love you", I broke up a few of the pretzels to create these fun ones to eat.


I had a little leftover chocolate so I placed the chocolate in disposable piping bags, cut a small tip off the end and piped cupcake toppers onto parchment paper and put them in the fridge.

I baked up a couple dozen Red Velvet Cupcakes and put my toppers on them.  Patty - just posted a Red Velvet Cupcake with the cutest toppers, will have to try those soon.


I hope that all my loves knew that I love them!

I was staring at the calendar this morning and wondering where my week went yet again.  It was just Monday, wasn't it?  I must confess to my mind being elsewhere these days.  I have so many other things that are distracting me and keeping me going in multiple directions.  Some of my best days are when I can cast aside some of those distractions and just play around a bit.  What are some of your best days?

Enjoy,

Gina


Friday, January 25, 2013

Valentine's No-Sew Banners


Would you be my Valentine?  Please don't make me beg.  I've been busy getting ready to have some of my favorite little guests over.  We will immerse ourselves in sprinkles, glitter, gems and Valentine magic.

Since the majority of my guests are in the under 6 bracket I like to make sure that I have everything in an easy to assemble fashion when they arrive.  Especially the ironing (I barely trust myself with one, let alone them.) One of the projects we are going to make is No-Sew Valentine's Banners.

I will cut out all of the pieces and the kids can just assemble them when they arrive.

You will need to assemble a few things:
Assorted fabric scraps or heavy paper (if using paper, there is no need for the iron-on adhesive)
A few yards Heat n' Bond Adhesive Paper (I got mine at Wal-Mart)
An iron
Tacky glue such as Jewel-it
Small spool of twine, string or thin ribbon
Straight edge
Scissors
Hole punch
Googly eyes and gems (because they are just plain fun)
Scrap paper


For the Be Mine Banner cut (3) fabric rectangles that are 12-inches wide by 17-inches long. Then cut (3) heat n' bond strips that are 6-inches by 17-inches long.


Place the heat n' bond as close to the edge of the fabric as possible, run a medium-hot (no-steam) iron over it for about 2-5 seconds, let cool a few seconds and then remove paper.  Fold the fabric with the side facing farthest away from you and bring it to the side closest to you.  Press the fabric together for 8-10 seconds or so until the fabric is bonded.  Trim off edges where there is no adhesive.

Cut the fabric into (9) 6-inch by 5-inch squares and trim off sides of each to form a triangle shape. (You can reserve the scraps for another project.)  You can do it visually or by marking the center of the bottom and lining your ruler up with that point and the point at the top edge.


Cut a piece of heat n' bond that is 2 1/2-inches by 17-inches and fuse it onto the back side of a piece of fabric at least that size in the color you want the letters to be.  Use a pencil and draw letters that are approximately 2 1/2-inches by 2 1/2-inches.  I will draw lines every 2 1/2-inches so that I keep my letters uniform.  Be sure and remember you are drawing the letters in reverse of the way they will be when ironed on.  If I can't figure out the way a backwards letter looks, I will draw it on a scrap piece of paper and cut it out and reverse it and trace it onto the bonding paper.

Cut out all your letters, then peel the paper and place them on the triangles, then place the hot iron on them to fuse for 4-5 seconds.


To assemble the banners punch a hole about a 1/4-inch in from each of the top edge.  Cut (2) pieces of twine that are 13-inches long and cut (8) pieces that are 3 1/2-inches long.

Thread a 13-inch piece of twine through the left side of a triangle that is blank and tie the ends in a knot. Thread a 3 1/2-inch piece of twine through the right side of that same triangle and knot.  Pull the other side of the twine through the left side of the triangle with the B on it.  Repeat.  Finished banner is about 68-inches long.


The Snap I Love You banner requires a few more cuts, but it's totally worth it since it's so cute.

The head and tail started out as 6-inch wide by 6-inch long rectangles that were trimmed down to form a head and tail.  The body of the alligator is (10) 3 1/2-inch by 3 1/2-inch squares and the triangles on its back are formed by cutting 1-inch and 2-inch squares in half on the diagonal and then glued on from the back side along with the feet.  Don't forget the googly eyes and bling.

I cut a strip of white and glued it behind the opening of the mouth and cut little triangle shapes out to look like teeth.


Go ahead; tell me I'm not just the cutest thing ever!


Snappy Valentine's Day!

Just had to share these Almond Balls from Katty's Kitchen I tried this week.  They were so darn good we couldn't stop eating them; I don't think you could either.

Gina

Thursday, August 9, 2012

I'm Bored - Muffins, Nectarines, Basil and a Table


I haven't had enough things to do to keep me out of trouble these days, so I decided I needed to make some muffins to occupy some idle time while I'm canning enough marinara sauce to get me through the year.


Nectarine, Basil, Cream Cheese Muffins
2 cups all-purpose flour
2/3 cup granulated sugar
2 teaspoons baking powder
1/2 teaspoon baking soda
Pinch salt
6 tablespoons unsalted butter, melted
2/3 cup milk
2 large eggs
1/4 cup cream cheese, softened
1 1/2 teaspoons vanilla extract
1 1/2 cups yellow nectarine, cut into 1/4" pieces
4 large basil leaves, minced

Streusel Topping
1/4 cup light brown sugar
1/4 cup all-purpose flour
1/4 hazelnuts, chopped
2 tablespoons unsalted butter, melted

Preheat the oven to 400 degrees F.

In a large bowl combine the flour, sugar, baking powder, baking soda and pinch of salt, set aside.

In a small saucepan melt butter on low heat and leave it on for 5-6 minutes until it starts turning color or browning a bit.

Add the melted butter, eggs, milk, cream cheese and vanilla to the dry ingredients and mix until combined.  A few lumps are okay.

Gently mix in the nectarines and basil.


Scoop the batter into lined muffin cups.  I filled 13.  I did need a sample muffin anyways.

In a small bowl combine the brown sugar, flour, hazelnuts and melted butter.  Sprinkle over the muffins evenly.

Bake for 18-20 minutes.


These muffins came out amazing, yet I still thought I needed one more thing to do so I'm not bored.

I sold my old dinette set when we moved the first time, so I scoured Craigslist and scored this maple gem - sans the 80's blue upholstery.


I've already removed the cushions and have decided on a red French toile, but I have another problem.


The problem is I'm torn between what color to paint the chairs and legs of the table.  I've been researching chalk paint and I know I want to use it, but I can't decide between cream or black!!!

Any votes??  Hurry, please before I'm forced to toss a coin.  

While I'm waiting for you all to let me know what color I should paint, I'll just be sitting here enjoying one of my muffins.  


Pretty please don't keep me waiting too long; I really don't need any more muffins to enhance my muffin top.

Thanks,

Gina

Tuesday, July 31, 2012

Speculoos Cookies - A'la Patty


This last month was a complete blur, beginning with packing up our house and moving.  On moving day I slipped out to attend a Jam Party hosted by the lovely Azmina, attended by Lisa, Stephanie, Jean, and Liren.  We had such a great time and made so many tasty jams, and it was probably a great thing I was there and not at my house with the movers because they brought too small of a truck and ended up leaving part of my belongings behind.  We have decided that the bad luck that is following us around is Rusty and I will have to elaborate more on what I plan on doing about that later.

In the midst of the chaos, I was asked by a friend who owns a local orchard to start supplying them with jams for sale.  I made 40 jars for him and they were gone in no time, so in the spring I will start again, and I'm thinking that is going to keep me pretty busy.

This month ended on a good note though, I dropped my daughter off this morning for her first day of high school.  It's been a much harder road with her than my older daughter, keeping her on the right path and steering her towards choices that will make her successful later in life.  But then again, I'm pretty sure it said nowhere in the parenting handbook that this was going to be an easy job.

One of the people who couldn't make it to the party was Patty, she has become a dear friend to me and while I was missing her I recalled the Speculoo Cookies with Nutella she gave me at Christmas time.  Spicy, crunchy and just try and stop yourself at one.  I was thinking of her when I wrote this recipe.

Speculoos Cookies - A'la Patty
1/2 cup Speculoos Cookie Butter
6 tablespoons vegetable shortening
1 egg
1/2 cup granulated sugar
1/2 cup light brown sugar, packed
1 teaspoon vanilla extract
1 1/2 cups all-purpose flour
1/2 teaspoon salt
1/4 teaspoon ground cinnamon
1/8 teaspoon powdered ginger
1/8 teaspoon ground cloves
1/4 cup granulated sugar
Flake sea salt
6 ounces dark chocolate

Combine the cookie butter and shortening in the bowl of a mixer, mix for a few seconds until combined.  Add the egg, granulated sugar, brown sugar, vanilla, flour, salt, cinnamon, ginger, and cloves and mix until combined.

Make balls with the dough using a rounded teaspoon full of dough.  Place the 1/4 cup of granulated sugar into a small bowl and roll the balls into the sugar and place the balls on a cookie sheet lined with parchment or a silpat. I like to put one dozen per cookie sheet.


Bake the cookies at 350 degrees F for 9 minutes.  Cut a large bar of dark chocolate into small chunks, enough for each cookie.  Add a chunk of dark chocolate to the top of each cookie and press down a bit.  Return to the oven and cook for 3 more minutes.


When you remove the cookies from the oven sprinkle each one with a scant amount of sea salt.  5 or 6 pieces per cookie.  Let cookies cool on a rack.  You can omit the salt, but for me my favorite part of a chocolate chip cookie is when I get a hit of salt in a bite.


Makes 24-30 cookies, depending on the size of them.

Enjoy,

Gina

Sunday, February 19, 2012

Rainbow Spring Rolls - Vegetarian


I have to confess to not eating so well lately, all the packing is cutting into my kitchen time.  What I have been truly craving was something quick and healthy.  Have you ever sat there staring at something you made and thought, "What the heck am I going to call it?"  If it hadn't been for the rainbow of veggies staring back at me on the plate, I may have had to call these Rolled Up Veggie Whatchamacallits or Whatchamwhosits.


In between packing boxes I tossed a few of these tasty rolls back for fuel.  Hot Dog Dude willingly ate them with me, but I could tell he would have preferred something else.  He's a hard core meat kinda guy.  I admit it; I'm kind of a mean wife sometimes.  I'm always nagging him about what he eats and nudging him towards healthier choices.  I thought he was going to lose it when I lectured him on the lunch meat he was stuffing down his face the other day.  He snapped back, "What else am I supposed to eat?"

He tends to be the kinda guy who wants to eat the same thing all the time.  I only nag him so he can add a little variety to his diet.  One can't live by lunch meat alone, well actually Hot Dog Dude could - hence the name.

Gather the following:
Leaf lettuce
Asparagus, washed, ends trimmed and blanched
Carrots, peeled and thinly sliced
Red bell pepper, thinly sliced
Blueberries
Rice paper spring roll wrappers

Prepare Sushi Rice:
For rice maker:  2 scoops medium grain rice and water filled to the second line
Or saucepan:  1 1/2 cups rice and 3 cups water

Seasoned rice vinegar mixture
3 tablespoons seasoned rice wine vinegar
3 tablespoons granulated sugar
1 teaspoon salt

Would you still love me if I told you I'm terrible at making rice?  If it wasn't for one of my favorite kitchen appliances the rice maker, we would probably still be eating burned rice.


I love throwing the water and rice in, pushing the button and walking away.

When the rice is finished steaming, open the lid and let it cool down for 5 minutes or so.  Combine the seasoned rice vinegar, sugar and salt in a small bowl and microwave for 40 seconds or so until the sugar is melted.  Place the rice in a baking dish, pour the vinegar mixture over it and gently stir the rice with your paddle to coat the rice, you want to be careful not to break up the rice. Leave it on the counter until its cool enough to work with.

To soften the spring roll wrappers use a squirt bottle.  Spray both sides and shake of the excess water.  Place the wrapper on a plate and put a piece of lettuce in the middle.  Place a row of rice on top of that; add some carrot, bell pepper and asparagus.  Drizzle with fresh lemon juice or I used a special Meyer Lemon Olive Oil I picked up last time I was in San Francisco.


Before I rolled them up, I placed a row of blueberries in a strategic location:


Grab the wrapper side that is in front of you and start rolling tucking in the sides as you go.  I threw the blueberries in for a little extra crunch and anti-oxidants, plus I had seen Kim's Blueberry Waffles and Sandra's Blueberry Mousse that really put me in the mood for some blueberries.


Before you go thinking I'm the worst wife ever for making her husband go meatless for an afternoon, I actually made him something special the next day that was right up his alley.  I'll share his idea of an ideal lunch with you in a couple days.

p.s.  Hot Dog Dude doesn't know about his nickname, should I clue him in or just keep giggling about it behind his back.  So wrong, huh?

Enjoy,

Gina